

You will also need:
Tube of your choice. I've chosen to use the artwork of Lon Ryden. He used to be licensed through CILM, but has since gone FTU, I believe.
Animation Shop - at this time, I'm not sure where you can get this program, if you don't already have it. You may, however, save the tut as a static (non-animated) image if you like.
Scrap kit is FTU by Hezalin of HezaScraps & Tags. The kit I'm using is called Football Freebie.
Filters used are Eye Candy 3.1 - Glass and Eye Candy 4000 - Gradient Glow. These filters were only used on the name in this tut. You may choose to do something different, it's all up to you.
My Supplies: Mask 007 and the fireworks file a240a.gif. You can get those here.
Font: I used Brady Bunch Remastered
Put your fireworks .gif file where you keep your animations. Load the mask, or open in PSP and minimize.
Let's do it to it!
Open a new file, 700 x 700, white.
Open Paper 6. Copy and paste it onto your new canvas.
Apply Mask 007. Delete mask layer. Answer "yes" to the pop-up question. Merge group.
Open the round frame. Copy and paste it onto your canvas. Move it around 'til it seems centered.
Open Paper 4. Copy and paste, below the frame and above the mask.
Grab your magic wand. Click inside of frame. Selections > Modify > Expand by 7.
Click your green paper layer. Selections > Invert. Hit delete. Selections > Select None.
Now move your mask layer to be centered under the frame and green layers.
Open Word Art 3. Copy and paste inside frame area. Drop shadow.
Apply your tube of choice. The one I used looks as though it is stepping out of the frame. To do that:
Grab your magic wand again. Click inside frame. Selections > Invert.
Get your eraser brush, and, making sure you're on the tube layer, erase the foot (or whatever if you're doing this with another tube) that's hanging over the frame. Selections > Select None.
Open the megaphone. Copy and paste, arranging as desired. I rotated mine right by 15°. Drop shadow.
Open all the flags, and resize them 50%. Copy and paste in the order you find works for you. I did four, then merged those four together. Duplicated that layer, then moved the duplicate to be flush with the first four. Then merged those two layers together. Drop shadow.
On the frame layer again, grab the magic wand. Click inside frame, Selections > Modify > Expand by 7. Selections > Invert.
Go back to the flags frame and delete. Selections > Select None.
Drop shadow your frame at this time.
Add your name, copyright, license info if applicable. And don't forget your tagger's/watermark!
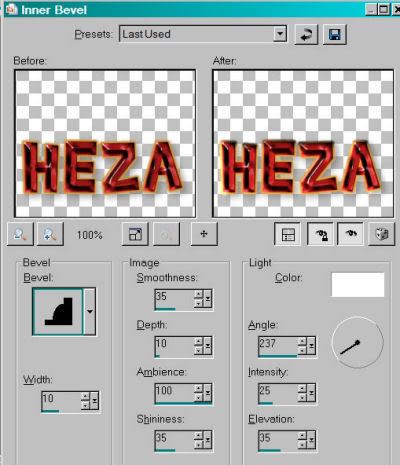
For the name on this tag, I used the following Inner Bevel:
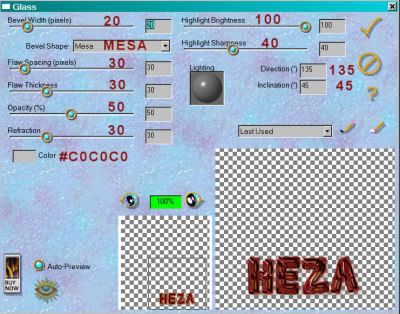
I then used Eye Candy 3.1 > Glass with the following settings:
And Eye Candy 4000 > Gradient Glow:
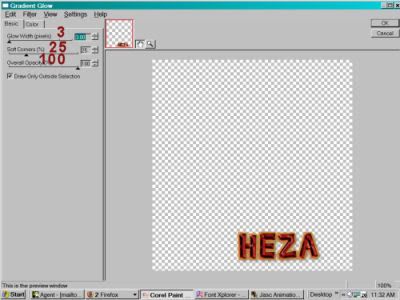
I used the gold from the "Touchdown" word art, and did the gradient effect twice.
Resize tag.
You may save and use this tag as is, or elect to go on to animate.
A N I M A T I O N
Close all layers above the frame, and including the frame.
Edit > Copy merged.
Over to Animation Shop. Paste as new animation.
Duplicate your frames until you have 20.
Open a240.gif
Edit > Select all. Edit > copy.
Go to your new animation and Edit > Paste > Into Selected Frame.
Center the fireworks on one of the static fireworks included with the word art we've used.
Repeat these steps until you cover all three of the fireworks.
View > Animation.
If satisfied, we're going forward! If not, Edit > Undo Paste and re-arrange to your satisfaction.
Okay, back to PSP.
Close off all open layers, and open all the closed!!
Edit > Copy Merged
Go back to Animation Shop and paste as a new animation.
Duplicate the frames until you again have 20.
Edit > Select All. Edit > Copy
Go to your working animation and Edit > Paste > Into Selected Frame
Make sure you have it all lined up correctly before your make your mouse click!
View > Animation.
We're done! Save as .gif file!
Thank you once again for trying my tuts! I appreciate it, and as always Drop me a line if you have any questions!
.


No comments:
Post a Comment