
You will also need:
Tube of your choice. I've chosen to use the always cute artwork of Joel Adams. You must have a license to use his work. You may purchase that license at CILM.
Animation Shop - at this time, I'm not sure where you can get this program, if you don't already have it. You may, however, save the tut as a static (non-animated) image if you like.
Scrap kit by Swheat Creations. The kit I'm using is called Whole Lotta Love. Thanks, Norma! This is a PTU kit, but there is a freebie at her site as well. You can get that here.
Filter: Eye Candy 4000 -- Gradient Glow
Font: I used Floralies for the name and L850 Script Regular for the circular text.
Supplies: Some "hippie" supplies. I picked this up along the way. If it is yours, let me know so I can either give you credit or take it down. Also, the preset shape for the peace sign. You can find these supplies here.
Ready? Let's do it again! LOL
Load your preset shapes. Open the hippie stuff in PSP and minimize.
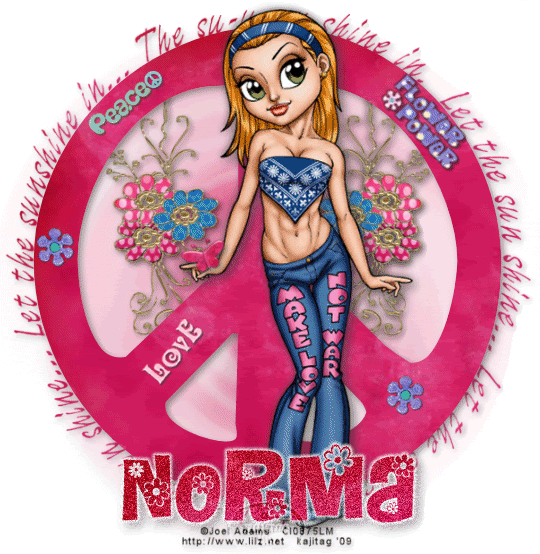
Open new file, 700 x 700, white.
Open Bkgd8. In your materials palette, click on fill color and choose "pattern." Choose this paper as your pattern and hit "OK."
Open your preset shapes and locate the peace sign. Draw out peace sign to a size that you like and then Objects > Align > Center in Canvas. Convert to raster layer. Drop shadow.
Add your tube of choice. Position where you'd like it to be, and drop shadow.
Open the "hippie stuff" from my supplies. Select those that you'd like to us. Copy and paste onto peace sign, and arrange in a way that works for you. I resized mine larger, just FYI. Drop shadow these elements.
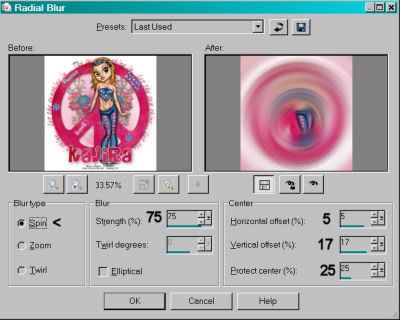
Open Splat6. Copy and paste below the peace sign layer. Resize to your liking (I believe I used 115%)
Adjust > Blur > Radial Blur, with the following settings:
Open the flower doodles from the kit. Place where you like. I put mine to the left empty spot in the peace symbol and under peace symbol layer in palette. Duplicate this layer and Image > Mirror. Drop shadow both.
Open butterfly1 if desired. Re-size and position as desired. I used it very small and put it on my tube's outstretched hand.
Go to a layer somewhere in the middle of your layer palette.
Preset shapes: Ellipse. Close off file color. Line width 2. I used black, it's okay to use any color.
Draw out a circle until just on the edge of your peace symbol. If off a bit, use re-size until the desired size.
Go to top of layer palette. Choose font tool. I used L850 Script Regular for my text. I also used the Bkgd8 as my fill color for the text. Hover your font tool until it intersects with the vector circle you just made. You will notice a small curve appear in your cursor. Apply text. I used words from the song "Aquarius," to keep with the theme...
Add your name. I used Floralies, and again used the Bkgd8 as fill. Add Eye Candy Gradient Glow at a setting of 4 -25 -100. Color white. Drop shadow your name.
Add your copyright, license if applicable, and tagger's/watermark.
Resize your tag now. I cropped out a lot of white space before I finally resized.
Duplicate your name layer two times, for a total of 3 layers. X out the top two layers and highlight the bottom one.
Adjust > Add/Remove Noise > Add Noise with settings below:
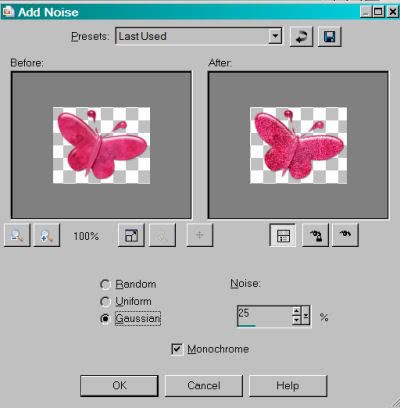
X out that layer and open and highlight the middle one.
Adjust > Add/Remove Noise > Add noise with the same everything, except change the number to 30.
X out that layer and open and highlight the top layer.
Again, Adjust > Add/Remove Noise > Add noise and use the number 35.
X out the top two layers again, and open the bottom layer of your name.
Edit > Copy merged
Open Animation Shop. Paste as new animation.
Back to PSP, X out the bottom layer and open the middle. Edit > Copy merged
Going back to Animation Shop, Edit > Paste > After current frame
Then once more back to PSP, X out the middle name layer and open the top. Edit > Copy merged
Back in Animation Shop. Edit > Paste > After current frame.
Then just View > Animation. If you like what you see, save as a .gif! And we're done!
I hope you enjoyed this tut. And I hope you're enjoying your weekend! Have a wonderful day!


No comments:
Post a Comment