
You will also need:
Tube of your choice. I've chosen to use the great artwork of Elias Chatzoudis. You must have a license to use his work. You may purchase that license at My PSP Tubes.
Animation Shop - at this time, I'm not sure where you can get this program, if you don't already have it. You may, however, save the tut as a static (non-animated) image if you like.
Scrap kit by Norma of Swheat Creations. The kit I'm using is called Daisy Pink.
Only filter used is DSB Flux - Bright Noise. That will be optional, dependent upon whether you want the sparkly diamonds all around your frame. That takes a lot of repetition.
Font: I used Marnie Regular
Supplies: The diamond, and the mask, which is by Essex Girl. You can get these here.
Ready? Let's do it again! LOL
Open your supplies and minimize in PSP. You may load your mask if you wish.
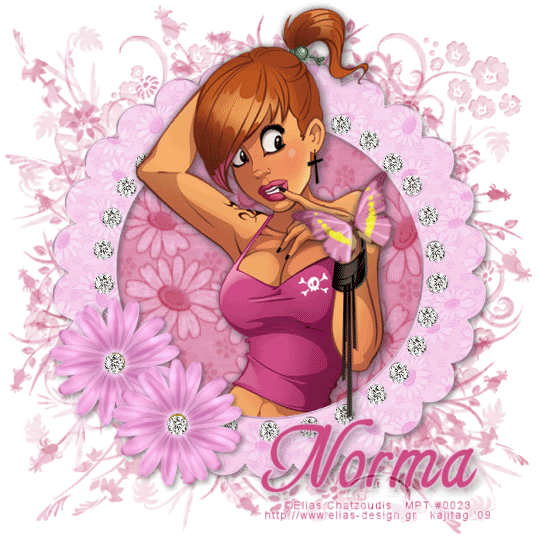
Open a new image 700 x 700 white.
Open Pink Bkg10. Copy and paste onto your canvas. Apply your mask. Delete mask layer, answer "yes" to the pop-up question, and merge group.
Open Frame 4. Copy and paste onto your canvas.
Open Pink Bkg10 again. Copy and paste onto your canvas, above the mask and below the frame.
Grab your magic wand and click inside the frame. Selections > Modify > Expand by 5. Selections > Invert
Move to your Pink Bkg10 layer and hit delete. Selections > Select none.
The following is the way I do tubes in frames. You may have learned a different way. I just found this more efficient for me.
Add your tube as the top layer. Position as you like. Drop shadow your tube.
Go back to your frame layer and again grab the magic wand and click inside frame. Selections > Invert
Grab your eraser brush and highlight your tube layer. Click your eraser brush along the bottom of the tube, where it overhangs the frame. Selections > Select none.
Drop shadow your frame.
Open Daisy 5. Resize 65%. Copy and paste onto the frame, bottom left area. Duplicate and arrange flowers as you like. Drop shadow your flowers. At this point I merge them down as one layer, it's up to you.
Grab your diamond, which I supplied. Copy and paste twice, and move into the centers of the flowers. Merge these two diamonds down and re-name "flower diamonds."
Open the butterfly3. Resize by 50%, then by 75%. Copy and paste onto your canvas as you like. I chose to put it on the hand of the tube. I rotated it left by 25°. Drop shadow.
Now, you can leave it like this, or you can copy and paste all the diamonds to fill the holes around the frame. It takes a while, but that's what I did for the example above. If you decide to do this, when you're done, merge all these diamond layers together and re-name "frame diamonds."
Add your name, copyright info, license if applicable, and your tagger's mark and/or watermark.
Resize your tag to your preference.
You may save now if you like, or go ahead with animation.
ANIMATION
Duplicate your frame diamonds twice, for a total of three layers. Close out the top two layers.
Do the same for the flower diamonds.
Highlight the open diamond layer of choice. Effects > Plug-Ins > DSB Flux > Bright Noise. Set intensity to 30. Hit "mix" once.
Do the same for the other bottom diamond layer, if you've done the frame as well.
Close out those two diamond layers, and open the middle layers of both the frame diamonds and the flower diamonds.
DSB Flux again, hit "mix" twice. Do the same for the other middle layer. Then close out the middle layers and open the third layers.
Repeat DSB Flux. Hit "mix" three times for both layers. Close out your top effect layers and re-open the first of both sets.
(This sounds horribly confusing to me, writing this. I hope you're following! Drop me a line if you get lost!)
Edit > Copy Merged
Go to Animation Shop and right click the blank area, paste as new animation.
Back to PSP. Close out the bottom layers of both the "frame diamonds" and "flower diamonds," and open the middle layers in both.
Edit > Copy Merged
Go to Animation Shop. Edit > Paste > Past after current frame
Back to PSP. Close out the middle layers of both the "frame diamonds" and "flower diamonds," and open the top layers in both.
Go to Animation Shop. Edit > Paste > Past after current frame
View > Animation. If happy, go ahead and save as a .gif!
Thank you again for trying my tut. Please let me know on this one. It's quite confusing, I bet!!
Hope you're having a wonderful day/night/wherever you are!
.


No comments:
Post a Comment