

You will also need:
Tube of your choice. I've chosen to use the great artwork of Misty Benson. You must have a license to use his work. You may purchase that license at My PSP Tubes.
Scrap kit is by Loyal of A Dash of Whimsical Creations. The kit I'm using is PTU and called Cupid Caught!. If it helps defray costs at all, I'm posting another tut using the same kit today. So you get two for the price of one scrap kit. And it's on sale right this moment for $1.65 at Treasured Scraps. Not bad! Be sure to catch the sale!
Only filter used is Greg's Factory Output Vol. II -- Pool Shadow. That will be optional, dependent upon whether you want it on your name in the tag.
Font: I used Brahn Muffin
Supplies: Mask -- Heart-burst. I have this one repeated under different names in my mask folder. If it is yours, please let me know so you can get credit! here.
Okay, let's do it! Quick and dirty, as they say.
Open the mask in PSP and minimize, or load into your masks file. Whichever you like.
Open a new file, 700 x 700, white.
Get Papers_005. Copy and paste onto your new file as new layer.
Apply your heart-burst mask. Right click on your mask layer in the layer palette and delete. Answer "yes" to the pop-up question. Merge group.
Open Elements_008. Copy and paste as a new layer. Resize by 150%, and then again by 130%. Colorize to match the tube. If you're using the same tube, it will go like this:
Adjust > Hue & Saturation > Colorize. My settings are 223 & 127.
Arrange the flower to your liking. Drop shadow.
Add your tube of choice. Place on flower as you like. Drop shadow.
Open Elements_011. Copy and paste onto your canvas as new layer. Position to the right of the tube. Colorize as needed.
Get your magic wand and click in the center of the frame. Selections > Modify > Expand 7 > Invert
Open Papers_003. Copy and paste as new layer and arrange below the frame layer. Delete. Selections > Select none. Colorize the paper as needed.
Duplicate your tube layer, and Image > Mirror. Position this layer to your liking within the frame. Arrange so this layer is below frame, and above the paper background.
Change the layer properties to Luminance (Legacy). Reduce the opacity of this frame to about 60.
Open Elements_018. Copy and paste as new layer. Colorize as needed. Position to the top right corner of the frame. Drop shadow.
Open Elements_035. Copy and paste as new layer. Move to the area of the frame. Colorize as needed.
Use your pick tool (In PSP X.03, it's under the move tool -- just click on that little arrow, and you'll find it) to stretch the word art to fit the frame as you like. Drop shadow word art.
Drop shadow your frame.
Add your name. On my name, I used a stroke of 3 with black as the stroke color and the dominant color from my tube as the fill. After your name is done, and placed as you like, go:
Effects: Greg's Factory Output Vol. II > Pool Shadow
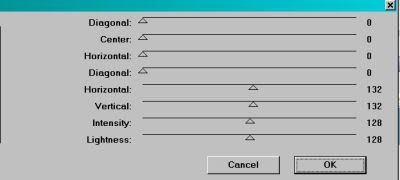
In case you cannot see the numbers, the settings are: 0-0-0-0-132-132-128-128
Drop shadow your name. Add your copyright info, license info if applicable, and your tagger's and/or watermark. Be sure to give yourself credit!
Resize to taste and save as desired!
Thank you so much for trying my tut! Drop me a note if you have any problems at all. Have a great day!!
.


No comments:
Post a Comment