
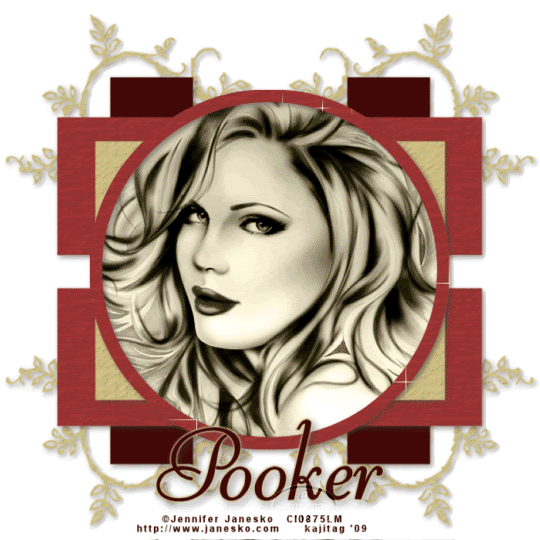
[Click image above to go to full sized image.]
You will also need:
Tube of your choice. I've chosen to use the gorgeous artwork of Jennifer Janesko. You must have a license to use her work. You may purchase that license at CILM.
Animation Shop - at this time, I'm not sure where you can get this program, if you don't already have it. You may, however, save the tut as a static (non-animated) image if you like.
Template by Yvette. I'm using Yvette_EOC_Template51.pspimage. It's from her old blog, here.
Scrap kit by Pooker of Pooker's Creations. It's called "A Retro Thing." Be sure to leave her some love! She does FTU and PTU, so look around if you have the inclination.
Filters: VM Natural - Sparkle -=- Eye Candy 4000 - Gradient Glow
Font: I used Moskovia Script, a pay font.
My Supplies here. This is just for the doodle. It says it's "Yezdoodles" made by Yez, so if you know where I can find Yez, let me know. I've just picked a bunch of his/her doodles up over the years.
Let's get to it...
Open Yvette_EOC_Template51. Window > Duplicate. Close out original. Delete the copyright layer.
Resize all layers to 550 x 544 pixels.
Image > Canvas Size > 700 x 700, making sure you're using the center alignment. See below.

.
Highlight template layer 4.
Selections > Select All > Float > Defloat > Modify > Expand by 1
Grab paper 2. Copy and paste onto your canvas as new layer. Selections > Invert > Delete
Select none.
Merge down the paper layer to the template layer.
Highlight layer 3. Do the same steps for this layer and layer 2, using the papers of choice or you can use what I did. Layer 3: Paper 1. Layer 2: Paper 3.
Highlight layer 1.
Selections > Select All > Float > Defloat > Modify > Contract by 15
Copy and paste Paper 1 onto your canvas. Hit delete. Selections > Invert > Modify > Expand by 16
Delete. Selections > Select None. Rename this layer "Ring" if you like for "keeping track" purposes.
Stay on the ring layer you just created.
Magic wand > Click inside of ring.
Selections > Modify > Expand by 5.
Highlight template layer 1. Grab paper 4, copy and paste to your canvas. Selections > Invert > Delete.
DO NOT DE-SELECT!!
Add the tube of your choice. Position as desired > Delete. NOW you may de-select!
Merge paper layer down to template layer 1; Drop shadow your tube as you like.
[NOTE: I chose to change the layer properties for the tube to "Luminous Legacy." You may choose to do so, or not.]
Highlight your ring layer.
Selections > Select All > Float > Defloat > Modify > Smooth > 10 and 10.
Duplicate this layer twice, for a total of 3 layers. Close off the top two layers and highlight the original.
VM Natural > Sparkle, with the following settings. I'm sorry this is so small. I needed to make it fit the blog!
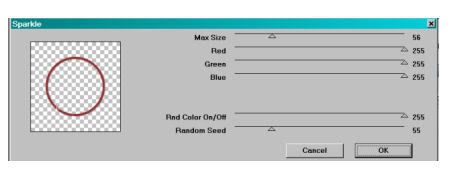
Basically, the top gauge is set at 56. All other gauges at 255, except the Random Seed, which is 55.
Close off this layer, and highlight your middle ring layer. Do the same with VM Natural > Sparkle, except change the random seed to 155.
Close off this layer, and highlight the top ring layer. Again with VM Natural > Sparkle, and change the random seed to 255.
[NOTE: I went back over the three rings a second time, using the settings in reverse order, to get more sparkle.]
Select none. Make sure the top two ring layers are closed off.
Grab your page of doodles. Choose raster 4. Copy and paste onto your canvas. [NOTE: I usually do this on the top layer, so I can see what I'm working with.] Move doodle to the top left of your tag. Duplicate > Mirror. Merge > Down. Duplicate > Flip. Merge down.
Move your doodle layer to just above your white background.
Selections > Select All > Float > Defloat > Invert
Grab paper 3, copy and paste onto your canvas. Hit delete. Selections > Select None.
Delete your original doodle layer, and add a drop shadow to your doodle if you like.
Drop shadow all other layers except the background in the frame (the layer behind your tube). Even the closed off ring layers!
Add your name. I added a Gradient Glow of 3 in the same shade as your doodles. Drop shadow.
Be sure to add your copyright info and watermark or note to give yourself credit as well.
Crop and resize. Here is where you would stop if you don't have Animation Shop. Voila!
ANIMATION
Edit > Copy merged. Take into Animation Shop and paste as a new animation.
Back to PSP. Close off the bottom ring layer and open the middle ring. Edit > Copy merged.
Take into Animation Shop and Edit > Paste after current frame.
Back to PSP. Close off the middle ring layer and open the top ring. Edit > Copy merged.
Take into Animation Shop and Edit > Paste after current frame.
Edit > Select all
Click on the top bar of your animation and change frame properties to 25.
View > Animation. If you're pleased, PLEASE let me know! Save as .gif.
And you're done!
I'd really appreciate some feedback on my tutorials. Not getting any makes me wonder "why?" If you have an answer for that, leave me a comment, too.
Thanks for looking and choosing to do my tut!
.


No comments:
Post a Comment