
You will also need:
Tube of your choice. I've chosen to use the great artwork of Elias Chatzoudis. You must have a license to use his work. You may purchase that license at My PSP Tubes.
Animation Shop - at this time, I'm not sure where you can get this program, if you don't already have it. You may, however, save the tut as a static (non-animated) image if you like.
Scrap kit by Pimp'd Tags Scraps. The kit I'm using is called My Thanks to You.
Filter: Eye Candy 4000 -- HSB Noise
Font: I used MissFajardose
Supplies: The mask, which is by Essex Girl. Thank you so much for your beautiful mask collection! You can get this here.
Ready? Let's do it again! LOL
Open a new file, 700 x 650. Surprised you, didn't I?
New raster layer. Selections > Select all.
Open paper 11. Copy and paste into selection. Selections > Select none.
Apply your mask. Delete mask layer, answer "yes" to pop-up question, and merge group.
Open the paper matte. Copy and paste as a new layer. Resize by 115%. Drop shadow.
Open the bling butterfly. Copy and paste as a new layer. Drop shadow applied : 3-3-55-3
Open your acrylic heart. Copy and paste as new layer. Resize by 115%. Colorize if needed. I used the settings 233 & 175. Add a soft, light drop shadow.
Open the big wrap bow 01. Copy and paste as new layer. Position as desired, see my tag for reference. I resized by 75% and moved down toward the bottom of the heart. Use your pick tool to extend it out past the edges of the heart.
Highlight the heart layer. Grab your magic wand and click outside the heart. Go back to your bow layer and hit delete. Selections > Select none. Drop shadow the bow wrap.
Add your tube of choice. Resize if necessary. Position as desired. Drop shadow.
Add your name, copyright information, license info if applicable, and your tagger's/water mark.
Resize to your liking. You can merge now and save as .jpg if you'd rather not animate.
A N I M A T I O N
Duplicate your butterfly bling layer twice, for a total of three layers. X out the top two layers, highlight the bottom layer.
Apply Eye Candy 4000 > HSB Noise with the following settings:
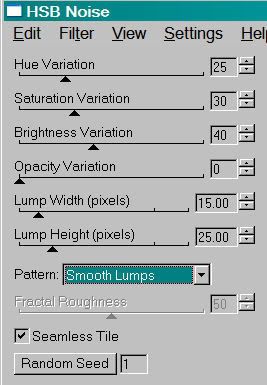
Click ok. X out your bottom layer and open & highlight the middle layer. Apply HSB Noise again, same settings, but click the "random seed" button. Click ok.
X out your middle layer and open & highlight the top layer. Re-apply HSB Noise, same settings, but again, clicking "random seed." Click ok.
Close out the top two butterfly bling layers and open the original.
Edit > Copy merged
Open Animation Shop. Right click the desktop area in A.S. and paste as new animation.
Back to PSP. Close the bottom layer and open the middle.
Back to Animation Shop. Edit > Paste > After current frame.
Back to PSP. Close the middle layer and open the top.
Again, back to Animation Shop. Edit > Paste > After current frame.
Edit > Select All. Right click on the top bar of the animation and change frame properties to 25.
View > Animation. Like what you see? Save it as a .gif, and you're done!
Thanks again for stopping by. Drop me a line if you have any questions. And leave me a comment if you liked the tut!!
.


No comments:
Post a Comment