

You will also need:
Animation Shop. This is from CNET, so it's a safe download. However, it costs. That changed pretty recently. I don't know why!!
BUT..... a LOVELY person named solshne wrote to let me know that one might find Animation Shop for free at this location. This is an FTP link and I have no idea if it's safe or not. So keep your antivirus handy to scan it after download!
A tube of your choice. I used the fun, sex art of Dominic Marco. You must have a license to use his art. You may obtain that license and his art from C.I.L.M.
The scrap kit is by Lissa, from Lissa E Designz. This is a FTU kit, called Midnight Star. This is in the third row, first kit.
Supplies: I've supplied the template, by Yvette. Thank you again, Yvette! You're the best! (Among many....) This is Template 66. Scroll aaallllll the way down (I'm viewing her site with Firefox, and she states quite obviously it's best viewed in IE. So at least for Firefox, it's aaallllll the way down) to the bottom of the page and she lists the links to all her templates. I've also supplied the bling. These supplies may be found here!
Filters: No outside filters used in this tut!
Font: I used BeautySchoolDropoutII.
Let us begin, then, shall we??
Open the template in PSP. File the bling to where it will be handy when we get to Animation Shop.
Window > Duplicate your template. Close out the original. Delete the copyright layer.
Resize for a working area of your choice.
Highlight Raster1. Open Paper10. Copy and paste as a new layer. Position your paper so that the amount of stars you'd like showing ..... will show within the circle.
Back to Raster1.
Selections > Select All. Selections > Float. Selections > Defloat. Selections > Modify > Smooth > Both boxes, checked, 10 in each box. Selections > Invert.
Highlight your paper10 layer. Hit delete. Selections > Select none.
Delete the template circle.
Repeat this process with the other two circle layers. For Raster2, I used Paper1 and rotated it 45° right. For Raster3, I used Paper10 again.
Delete the original circle layers.
I added a Gradient Glow of 4 - 0 - 100, color #837435 to each circle. I then added a drop shadow to each circle -- even though they're all black and you can't really see it. lol. Dunno if it makes a difference or not!
Open LargeBowWrapGold. Resize 50%. Position where you'd like it in relation to the circles. I used my pick tool
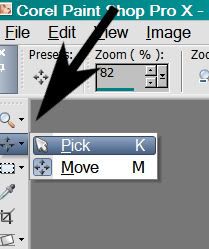
to stretch the ribbon out on both sides, so it fit the circles the way I liked it. Drop shadow your Bow Wrap.
Add your tube. Resize, position and drop shadow to your liking.
On your top layer, add your name. I again used color #837435 for the fill, black for the stroke, stroke set at 2. I then again added the same Gradient Glow as we used above. Drop shadow your name.
Add your copyright, license information if applicable, and taggers'/watermark.
A N I M A T I O N
Edit > Copy merged
Open Animation Shop, right-click on the desktop area and paste as a new animation.
Duplicate this frame until you have a total of 21 frames. Move your slider at the bottom back to the first frame.
Locate and open your bling. Edit > Select All. Edit > Copy
Return to your animation that you're building and Edit > Select All. Edit > Paste into Selected Frame.
Hover your mouse until the tip of the bling appears. If you have a tube like mine with a wand or glowing tip of some kind, move the tip of the bling over the wand and release your mouse button.
If you're not using a similar-type tube, go your own way! :)
Animation > Resize Animation > Size the finished product to a size with which you're comfortable.
View > Animation. Save as .gif and, voila once more! We are done!! Thanks for taking it on! I hope you enjoy your results!
.


I'd like to send you the tag I made with the above tut but don't know where..my blog site is http://wwwalwayscreations.blogspot.com
ReplyDelete