
You will also need:
A tube your choice. I'm using the sexy artwork of Gennadiy Koufay. You must have a license to use his work. You may purchase that license at CILM. Koufay is leaving CILM soon, so get them while they're extra-sizzle hot!
Scrap kit is by Malu, of Armazem Scraps. It's a FTU kit, called Xeque Mate. This is a very small kit, but it's black and white, so I had to go for it! Loving those black and white tags!
[Please Note: I made this tag for Mariel, as I had gotten the impression it was Mariel's site and scrap kit. I've just been notified (04-22-2009) by Malu that SHE owns Armazem Scraps, and Mariel is a member of her CT. I'm so sorry Malu! I didn't mean to get that wrong, believe me! So you're all clear, this scrap kit is by Malu!!!]
Filters: Eye Candy 3.1 > Glass, Eye Candy 4000 > Gradient Glow
Font: I used Fleetwood
Supplies: Just the mask. I don't know where I got this one, either. Please let me know if it's yours! I'll give you proper credit! You can get the mask here.
Also, please, if you have problems with the download link for supplies, drop me a line via e-mail. Leaving a comment without a way for me to contact you back doesn't help. If you e-mail me, I'll send you the supplies.
Let's create!! This tut is a little fiddly. I had to consult the help files in PSP to figure out what I was doing. It was so easy, I'm sure you guys already know how to do it!!
Open a new image, 700 x 700, white.
Open Paper 3. Copy and paste as a new layer. Now we get to use our pick tool. (This is for PSP X.03. I keep referring to the pick tool, and I'm not sure the earlier versions had it.) Here's a shot:
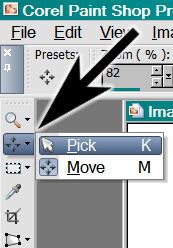
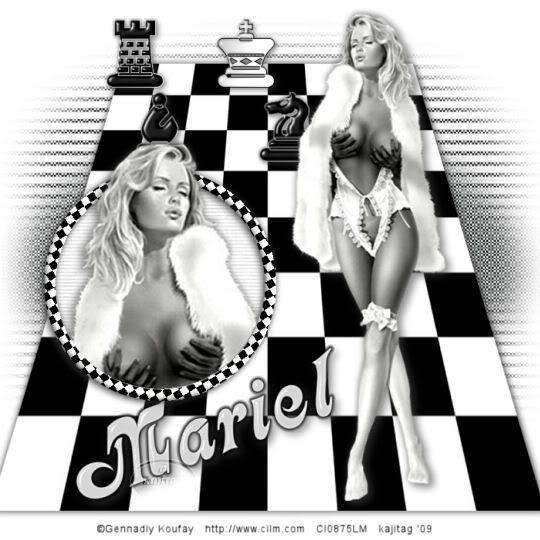
Hold down the CTRL button while using the pick tool, to move the corners of your paper in (on the top) and out (on the bottom) AND up and down, 'til you get a good looking perspective on the paper. You can see my tag for reference purposes. Notice that I didn't bring it ALL the way down to the bottom, nor to the top of the canvas. The sides, on the bottom, run off the canvas a bit. When you've got it like you want it, then drop shadow softly, both positive and negative. Meaning, for example my shadows are set at 3 - 3 - 55 - 3. And then I went back to go -2 - -1 - 55 - 3.
Open your "pecas" elements. (These are the chess pieces.) I don't know if you're familiar with chess or not, but I tried to make a check mate situation on my "board." I have looked at it and looked at it, and I know it's NOT a check mate situation, but oh well.
You'll need to draw a selection around each piece you want to use, and then copy... then paste on your "board." I chose the rook, the king, the bishop and the knight. Drop shadow your chess pieces.
Add your full-body tube. Resize, position and drop shadow to taste.
Open Frame 1. Copy and paste as a new layer. Position where you think it would look good on your tag. I chose the lower left area, sort of. lol. See my tag for placement reference, if you like.
Mirror your full-body tube and resize as you wish. Copy and paste as a new layer, positioned over the frame. Get it the way you'd like it and drop shadow.
Highlight your frame layer. Grab your magic wand and click inside the frame. Selections > Modify > Expand by 5. Selections > Invert.
Highlight your tube layer. Now grab your eraser brush and erase any part of the tube you don't want showing below the frame. DO NOT DESELECT!!
Open Paper 4. Copy and paste as a new layer. Drag this layer below the frame layer. Hit delete. Selections > Select none.
Highlight your white background layer. Add a new raster layer. Selections > Select All.
Open Paper 2. Copy and paste INTO SELECTION. Selections > Select none.
Apply your mask. Delete mask layer, answer "yes" to pop-up question and merge group.
Add your name. I used white for the fill. No stroke.
Effects > Plugins > Eye Candy 3.1 > Glass with the following settings:
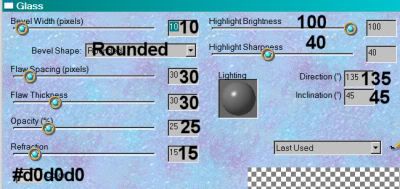
Click on the check mark (means okay lol).
Effects > Plugins > Eye Candy 4000 > Gradient Glow set at 5 - 0 - 100, preset of "medium," color black.
Hit okay.
Drop shadow your name.
I chose to rotate the name, 20° left.
Add your copyright, license information if applicable and taggers'/watermark.
Resize your tag to the size of your choice. Now, just merge your layers, and save! Et, voila! I hope for you it was quick-n-easy!! Thanks for stopping by!
.


Hi! This scrapkit isn't from Mariel. It's from Malu, owner of Armazem Scraps. Mariel is from my CT. Hugs. Malu
ReplyDeleteI apologize whole-heartedly, Malu. I've included the correct info in the tutorial. I feel bad. :(
ReplyDelete