
You will also need:
Animation Shop - I've found it here! This is from CNET, so it's a safe download, too!
A tube of your choice. I'm using the erotic artwork by Barbara Jensen. You must have a license to use her work. You may purchase that license at Erotic Artist Gallery.
Scrap kit is by Monica, of Simply Sensational Scraps. It's a FTU kit, and is is called Silver Shaddow. I love black and white tags, so I had to take advantage of this freebie! Be sure to leave some love if you download this great kit!
Filters: Eye Candy 4000 > Gradient Glow, Mura's Meister > Copies
Font: I used Pen Tweaks Three SSi
Supplies: I've included two sparkly animations. I don't know from where they came. But the mask that's included is from the famed Becky. You can find these supplies here.
Let's go for it!!
Open your mask in PSP and minimize. Alternatively, you can load the mask into your PSP masks folder for use at a later date. :) Put your sparkly files wherever they will be handily available when you're in Animation Shop.
Open a new image, 700 x 700, white.
Open frame1. Copy and paste as a new layer. Resize 110%.
Highlight your white background layer and open paper 6. Copy and paste as a new layer.
Highlight your frame layer. Grab your magic wand and click in the middle of the frame. Now, see on the left hand side of the frame, there are a lot of little spaces created by the embellishment of the frame. Be sure to click inside all those nooks and crannys, as well.
Selections > Modify > Expand by 10. Selections > Invert.
Highlight the paper6 layer. Hit delete. Selections > Select none.
Add your tube. Resize, position and drop shadow whichever way you prefer.
Highlight the frame layer again. Click again inside the frame. If your tube isn't mixed up in the embellishment on the left, you won't have to do the clicking over there again. If it is, you will. lol.
Selections > Modify > Expand by 1. Selections > Invert.
Highlight your tube layer. Grab your eraser brush, and erase any part of your tube that is overlapping the frame on the bottom. Selections > Select none.
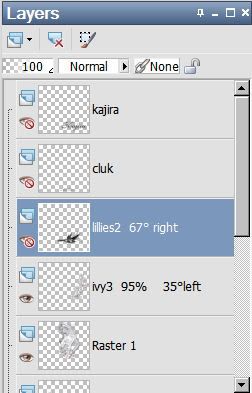
Open ivy3. Resize 95%. Copy and paste as a new layer. Rotate 35° left. Position to the right of the frame. Duplicate this layer and Image > Mirror. Pull it back to the left side of your frame. Position these two layers as you like them and drop shadow both. For the left side ivy, I changed the opacity to about 35, then highlighted the frame layer and drew a selection with the lasso tool set on point-to-point around the roses. Hit delete. Selections > Select none. Now the roses aren't covered up.
Also, you may notice the bottom stem of the two ivy layers sticking out at the bottom. Draw a selection around each piece of ivy and hit delete, on both layers.
At this point, I wasn't comfortable with how close my first ivy layer was to the side margin, so I highlighted the white background layer and went Image > Canvas size and changed the width to 750, centered.
Open lillies2. Copy and paste as a new layer. Rotate 67° right. Position where you'd like it. I had "modesty" issues with my tube, so the lillies cover up things that Photobucket would disagree to. Drop shadow your lillies.
Open fan4. Resize by 50%. Copy and paste as a new layer.
Effects > Plugins > Mura's Meister > Copies with the following settings:
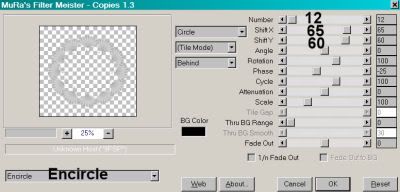
Now, apply Copies again, with the same settings.
Drag this layer down to just above the white background layer.
Apply your mask. Delete mask layer, answer "yes" to the pop-up question, and merge group.
Add your name. I used black as the fill color. No stroke. Effects > Plugins > Eye Candy 4000 > Gradient Glow set at 5 - 0 - 100, color white.
Drop shadow your name. Position as desired.
Add your copyright, license information if applicable and taggers'/watermark.
Resize your tag to the size of your choice. At this point you could stop, if you choose not to animate. Just merge your layers, and save!
A N I M A T I O N
Close off your name layer, your credits layer, and your lillies layer.
Edit > Copy merged
Open Animation Shop, right-click on the desktop area, and paste as a new animation.
Duplicate this frame until you have 16 frames. Move the slider at the bottom of your animation to the first frame.
Open the silver-sparkles file. Edit > Select All. Edit > Copy. Highlight the last frame of this animation and Edit > Paste > After Current Frame.
Now, both the silver-sparkles file and the twinks file have the same amount of frames. Use one, both, whatever you like to place sparklies onto your ivy on either side of your frame. To use, highlight the file you want and Edit > Select All. Edit > Copy. Go to the main animation we're building. Edit > Select All and Edit > Paste > Into Selected frame. Repeat this over and over, until you're satisfied with the sparkles.
Return to PSP. Layers > View none. Open the name, credit and lillies layers.
Edit > Copy merged.
Return to Animation Shop, right-click on the desktop area, and paste as a new animation.
Duplicate this frame until you have 16 frames. Move your slider to the first frame.
Edit > Select All. Edit > Copy
Return to the main animation we're making and Edit > Select All. Edit > Paste > Into Selected Frame.
Place the new frames where you'd like them to be in the final product, and release mouse button.
View > Animation. And we're done! I hope you've enjoyed this tutorial! Thanks for stopping by!
.


Hunni, your supplies link is corrupt, won't open. I'm doing the tut anyway, lol, it's beautiful!
ReplyDeleteSweetie your supplies link is corrupt and not working. I could not download them. What a beautiful tut.
ReplyDelete