
You will also need:
Tube of your choice. I've chosen to use the erotic artwork of Eugene Rzhevskii. You must have a license to use his work. You may purchase that license at My PSP Tubes.
Animation Shop - at this time, I'm not sure where you can get this program, if you don't already have it. You may, however, save the tut as a static (non-animated) image if you like.
No scraps in this tutorial!
Filter: Eye Candy 4000 Gradient Glow Eye Candy 3.1 Glass
[NOTE: There is animation in the scallops around the heart in this tag, but it's very subtle. Writing down the steps was a bit confusing, AGAIN! You can choose to animate these scallops or not. Totally up to you. I just hope you can follow me as I go in circles. LOL]
Font: I used AL Hurried Note
Supplies: Here. This includes the floating hearts, the mask, the preset shape file, the Valentine balloons and the word art.
The mask used is by Becky, who seems to have left the PSP community. Thank you Becky, wherever you are! Word art was made by me. Floating hearts and the preset shapes file were picked up along the way. If they are yours, let me know, so that I can give you credit! The Valentine balloons are by Rainbow Coffi of PSP Playground. I think you must be a member to get her work, but I don't recall. I've been a member there for years!
Ready to get PSP-butt?
Load the preset shapes into your preset shapes file. Either load your mask into your masks file, or open it in PSP and minimize. Open word art and Valentine balloons in PSP and minimize. Put your floating hearts animation wherever you keep your animation files.
Open a new image, 700 x 650, white.
Choose two colors from your tube. One will be your foreground, and the other, your background. For my purposes, I used #b60000 for the foreground and #b8417b for the background.
Go to preset shapes, and find heart "e."
Draw out your heart. Objects > Align > Center in canvas. Convert to raster layer.
Grab your magic wand and click on the scalloped area around the heart. Duplicate your heart layer two times, for a total of three heart layers. (If you chose not to animate, skip the duplication instructions, as well as all those instructions referring to the duplicates hereafter.) Go to your original heart layer and
Adjust > Add/Remove Noise > Add Noise with the following settings:
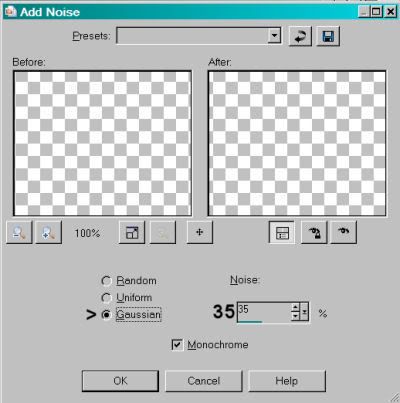
Hit okay. Go to your middle layer and again apply noise, this time with a setting of 40. Hit okay.
Go to your top heart layer and add noise with the setting of 45. Hit okay.
Selections > Select None.
Drop shadow your frame. All three layers.
X out of the top two heart layers. Highlight the bottom layer.
Grab your magic wand and this time click on the middle of the heart.
Effects > Texture Effects > Blinds with the following settings:
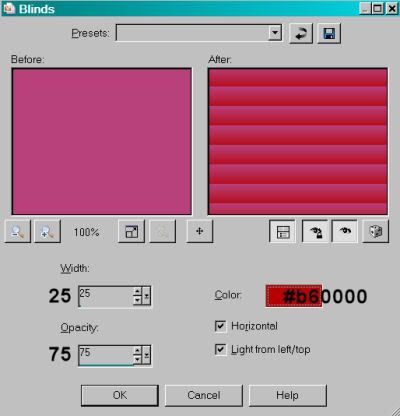
Do the same Blinds effect on the other two layers of your heart. Close out the top two layers again, working just with the original for now.
DO NOT DESELECT!
Resize your tube if necessary and Image > Mirror. Copy and paste on the left side of the heart. Position so the portion you want to show is within the selection. Selections > Invert, and delete. Drop shadow your tube, then duplicate this layer twice, for a total of three. Move each tube layer above one of the heart layers, so there's three of each, in order. Change your blend mode (on your layer palette) to "Screen." Do this with all three of the tube layers. Now, merge down your top tube layer to your top heart layer. Your middle tube layer with your middle heart layer. And your bottom tube layer with your bottom heart layer.
You can X out the top two layers again. You should now have three heart layers and your background of white.
Add your main tube. Position and drop shadow.
[For modesty purposes (Photobucket has conditioned me to do this. Now that I have a Fotki account, I have no explanation for why I did this automatically), I chose to put a bunch of balloon hearts over my tube's backside. If you have similar situation, now would be the time to resize down your balloon hearts a few times, then add to your canvas, and drop shadow.]
Open your word art. Copy and paste each layer into your canvas, arrange as you like. For mine, I decided to flood fill the emphasized words. I used color #b8417b. To do this, grab your magic wand again, mode set on "add" and click inside each layer. Then flood fill the word and deselect.
I placed a Gradient Glow of settings 4 - 0 - 100, color of white and preset of "Diffuse" on the word art.
Drop shadow word art as desired.
Add a new raster layer above your white background and below your original heart layer. Floodfill with color to match your tube. Again, I used #b8417b.
Apply your mask. Delete mask layer, answer "yes" to the pop-up question, and merge group. Reduce the opacity on your mask layer to 50.
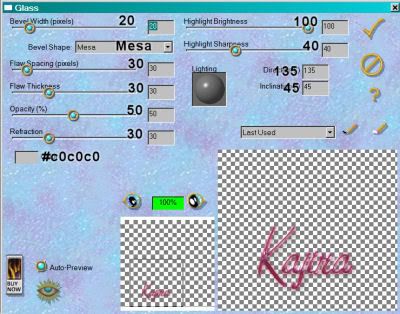
Add your name. I chose to apply Eye Candy 3.1 > Glass to my name. Settings as follows:
Drop shadow your name. Add your copyright, license information if applicable and tagger's/watermark.
Resize your tag.
If you are not animating, now would be the time to save your work, and you're done! If animating, keep on, keepin' on!
Okay, now here we go. LOL.
A N I M A T I O N
Edit > Copy merged
Open Animation Shop. Right click on your desktop and paste as new animation.
Go back to PSP. X out of your bottom heart layer and open the middle.
Edit > Copy merged.
Go back to Animation Shop and Edit > Paste > After current frame.
Return to PSP. X out of the middle heart layer and open the top.
Edit > Copy merged
Once more, back to Animation Shop and Edit > Paste > After current frame.
Make sure your slider on the bottom of your animation is all the way over to the left, or until you're on frame 1.
Edit > Select All. Edit > Copy
Highlight your third frame and Edit > Paste > After current frame.
Highlight your sixth frame and Edit > Paste > After current frame.
Now delete the last frame, so you have a total of eight.
Open your Image009.gif. Edit > Select all. Edit > Copy
Go back to your animation and make sure again that the slider is all the way to your first frame. Edit > Select All. Edit > Paste > Into Selected Frame. Positon your floating hearts where you'd like them on your animation and then release the mouse.
I did this twice as is, and then the third time with the floating hearts, I went Animation > Mirror and *then* Edit > Select all. Edit > Copy
Back to your animation and Edit > Paste > Into Selected Frame and position as your like. Release your mouse.
Making sure your entire animation is still selected, right click on the top bar of it and choose "Frame Properties." I changed mine to 15.
View > Animation. And we're done! Aren't you glad? LOL.
Thanks for trying my tut -- my first one without scraps. I'm not too sure how much I like it, but I worked on it for so long, I thought I'd share it anyway. Have a good day!
.


Love these ones Kajira..no scraps..yah.
ReplyDelete