
I got some VERY creative criticism the other day from a couple of comments on my "Glitter & Swing" tut. Denny suggested it would have been much easier to follow my instructions had I included screen shots, especially for making the keychain swing.
I'm new to tutorial writing, and I must admit that screen shots never entered my mind. I *know* how helpful they can be, especially doing manual animation like that. So, I apologize.
Had I saved this tag without layers merged, I'd have gone right back and re-created the layers and make some screen shots. But alas, that's not the case. I can only let you know that I will keep this suggestion filed away for use at a later date. And I'm sorry if this particular animation was difficult, or impossible, to understand.
(I used this same "technique," if you will, in one of my earliest tuts, as well. I got no comments then, but I don't think anyone had discovered this site yet.)
Mea Culpa! Now, onto the tut...
This tutorial was written on February 8, 2009, using Paint Shop Pro, version X.03. It should be okay to do with other versions as well. I just find X.03 more comfortable for me. You may download a free trial of Paint Shop Pro, version X2, from Corel. Any similarities between this tut and any others you may see are purely coincidental.
You will also need:
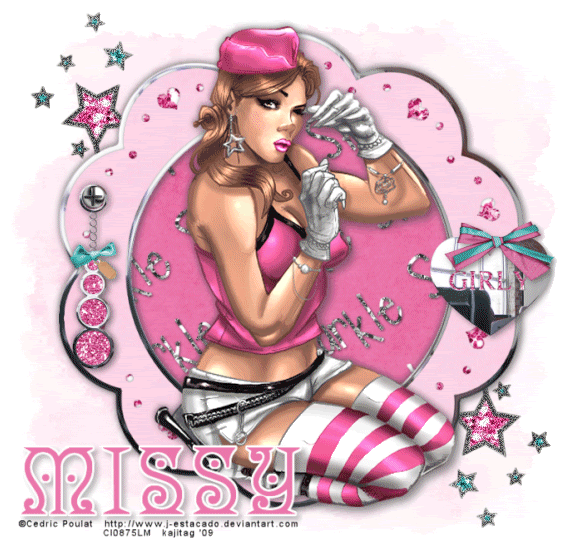
Tube of your choice. I've chosen to use the talented "comic" artwork of Cedric Poulat. You must have a license to use his work. You may purchase that license at CILM.
Animation Shop - at this time, I'm not sure where you can get this program, if you don't already have it. You may, however, save the tut as a static (non-animated) image if you like.
Scrap kit by Missy of Misfits Scrapz. It's a FTU kit, and just my opinion, but it's so great to see these girls start doing scraps again! This kit is called Glitter My Fancy. Leave Missy some thank yous if you download this kit!
No filters used in this tut!
[NOTE: I'm doing two different types of animation in this tutorial. One kind-of manual animation and one with noise. Once again, I'll let you know beforehand that it's a bit confusing in the end. But it turns out right! Enter if you dare!]
Font: I used Angel
Supplies: Here. This includes the mask and the screws.
The mask used is by Becky. I don't know where I got the screws. If they are yours, please let me know so I can give you credit!
Ready? Let's begin!!
Open your mask and minimize in PSP, or load it into your masks file. Open the screws and minimize in PSP.
Open new image, 700 x 650, white.
Open paper6. Copy and paste as new layer.
Apply mask. Delete mask layer. Answer "yes" to the pop-up question, and merge the group.
Open frame1. Copy and paste as new layer.
Open paper17. Copy and paste below the frame as new layer.
Highlight your frame layer, and grab your magic wand. Click inside the frame. Selections > Modify > Expand by 10. Hit delete. Selections > Select none.
Drop shadow your frame.
Add your tube, position and drop shadow.
Open chrome_heartcharm1. Resize 35%. Copy and paste as new layer. Position as desired. Drop shadow.
Open bow1. Resize 25%. Copy and paste over the charm, to make it look as thought it's holding the charm in place. Drop shadow. I merged this layer down to the charm layer.
Open keychain4. Resize 25%. Copy and paste as new layer. Position as desired. Drop shadow.
Open your screws. You can see, one is selected. If you don't necessarily want to use that screw, you can simply Selections > Select none and select the other. Copy and paste as new layer onto your canvas. Resize 15%. ALL LAYERS UNCHECKED! Position over the loop in the keychain, to make it appear as though it's holding the keychain in place.
Open glitterdoodle3. Copy and paste as new layer, just above your mask layer. Resize 95%. Free rotate to the right by 45°.
Using your selection tube, set on rectangle, or point-to-point, whichever you prefer, crop out the two "legs" of the doodle hanging under the frame on the left bottom corner of your tag.
Duplicate your glitterdoodle. Image > Mirror. Image > Flip. Merge these two layers down.
Add your name. To get the outline I used, I then Selections > Select All > Float > Defloat > Modify > Expand by 3. Add new raster layer. Move down below your name layer. Flood fill white. Merge down your two name layers. Drop shadow.
Add your copyright, license information if applicable, and tagger's/watermark.
Resize your image to your taste.
Now we're going to animate. If you choose not to, this is where you'd save your work and you're done!
You can choose to do the swinging keychain AND the glittery stars, or just the swing, or just the glitter. Read ahead to see what we're going to be doing and make your decision, then.... let's go!
Go to your keychain layer, and duplicate four times, for a total of five.
Highlight one layer, and free rotate right by 10°. Use your move tool and move this layer until the scews are all aligned so you can only see one.
Highlight another keychain layer, and free rotate right by 20°. Use your move tool again, and move this layer until the screws are again aligned, and you can only see one. Don't pay attention to the darkening drop shadow. This will go away!
Highlight another layer, and free rotate left by 10°. Line this one up so the screws are in postion.
And finally, highlight another keychain layer and free rotate left by 20°. Line this one up as well.
I arrange these with the 10° layers just above and below my straight up-and-down layer. Then arrange my 20° layers directly above and below those. I hope you're understanding what I'm saying! For some reason, for me anyway, it just is easier to arrange them this way.
Okay. You might want to leave the middle, straight up-and-down keychain layer open, and X out of the other four. We'll leave them for now.
Go to your glitterdoodle layer. Duplicate this layer four times for a total of five. Highlight your first layer and go Adjust > Add/Remove Noise > Add Noise with the following settings:
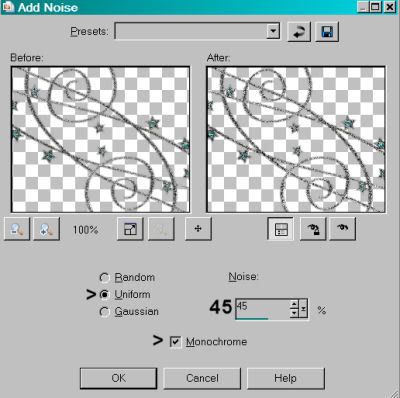
Hit okay.
Go to the next layer and do the same thing, but change the "Noise" setting to 50.
And, to the next layer and do the same thing, but change the "Noise" setting to 55.
Continue to the next layer and change the "Noise" setting to 60.
And finally, do your fifth layer and change the "Noise" setting to 65.
Close out the top four layers and leave the bottom one open.
We are going to use these glitterdoodle layers more than once to get this done. Here's where it might get somewhat confusing...
Now, Edit > Copy merged
Open Animation Shop, right click on the desktop area and paste as new animation.
Go back to PSP and close out the bottom glitterdoodle layer, open the layer above. Then go up to your keychain layers. Close out the straight up-and-down layer, and open the layer above it (if you arranged your layers like I suggested. If not, we're opening the layer that was rotated 10° right).
Edit > Copy merged
Back to Animation Shop. Edit > Paste > After current frame.
Return to PSP and close out the 10° right keychain layer. Open up the 20° right layer.
Close out your open glitterdoodle layer and open the middle layer.
Edit > Copy merged
Go to Animation Shop and Edit > Paste > After current frame.
Back to PSP. Close out the open glitterdoodle layer and open the one above it.
Close out the 20° right layer of your keychain, and open the 10° right layer once more.
Edit > Copy merged
Return to Animation Shop. Edit > Paste > After current frame.
And, back to PSP. Close the 10° right keychain layer and re-open the middle, straight up-and-down layer.
Go to your glitterdoodles and close out the open layer, and open the top layer.
Edit > Copy merged
Back to Animation Shop, Edit > Paste > After current frame.
And again, return to PSP. Close out the top glitterdoodle layer and open the bottom one again.
Go up to your keychain layers. Close out of the middle, straight up-and-down layer and open the layer below it. This should be your 10° left layer.
Edit > Copy merged
Return to Animation Shop, Edit > Paste > After current frame.
Go back to PSP. Close out your 10° left keychain layer, and open up the bottom layer, or the 20° left layer.
Go to your glitterdoodle layers and close the bottom layer. Open the layer above it.
Edit > Copy merged
Back to Animation shop and Edit > Paste > After current frame.
Once more, and finally, return to PSP.
Close out your glitterdoodle layer and open the middle one.
Go up to your keychain layers and close out of the current one, opening the one above it. (Or the 10° left layer.)
Edit > Copy merged
Finally back in Animation Shop... Edit > Paste > After current frame.
Now, Edit > Select All
Right click on the bar above your tag and choose "Frame Properties." I changed mine to 17.
Et, voila! We are finally done! View > Animation. Save as .gif and pat yourself on the back! I hope this was easy enough to follow, and I hope you enjoyed it!
.


Awesome tut hun
ReplyDeletethough some screen shots would
be very helpful !
for me anyway as I learn more by visual lol
Keep up the great work !!!
Oops meant to add screen shots for
ReplyDeletethe keychain animation bit
and how u layer them !!!
sorry I accidently left that out !!!
Hugs Denny
If it would help when I do the tut later, I can take some screen shots for the steps you would like them for and send them to you. I just don't have the CILM for the same tube you used, so the tube would be different. Just let me know.
ReplyDeleteBrizExoticEyes! You didn't leave a way to contact you. I tried through your AIM profile, but I don't have AIM so cannot even comment there. So I'm writing here, and will do another blog entry to your attention.
ReplyDeleteI think your offer is FABULOUS and I'd love to take advantage of it. My e-mail is kajira dot hill at yahoo dot com.
On to post! Thank you for offering. I hope you're able to understand my instructions!!