

You will also need:
Tube of your choice. I've chosen to use the great artwork of Gene Gonzales. You must have a license to use his work. You may purchase that license at CILM.
Animation Shop - at this time, I'm not sure where you can get this program, if you don't already have it. You may, however, save the tut as a static (non-animated) image if you like.
Scrap kit is by Patty at Honored Scraps. The kit I'm using is PTU, taggers' sized and called Love to Treasure. You may purchase this kit at Terminally Unique Designs! They're having a sale, so it's not much moolah for the punch it packs!
Filters: Alien Skin Eye Candy 5 Impact > Extrude, VM Natural > Sparkle
Font: I used Love Letters
No extraneous supplies for this tut!
Let's start!!
Open a new image, 700 x 650, white.
Open GlitterHeart1. Resize 125%. Copy and paste as new layer.
Open one of the tags from the kit. I chose "True Love." Copy and paste as new layer. Move down a bit on the heart.
Back to heart layer. Selections > Select All > Float > Defloat > Invert.
Now highlight the tag layer and hit delete. Selections > None. Drop shadow your tag.
Add your tube of choice. Resize as needed and drop shadow your tube.
Open LoveLock3. Resize by 50%. Copy and paste on the upper left side of the heart. Drop shadow.
Open Bow6. Resize 50% twice.
Adjust > Brightness and Contrast > Brightness/Contrast with the following settings:
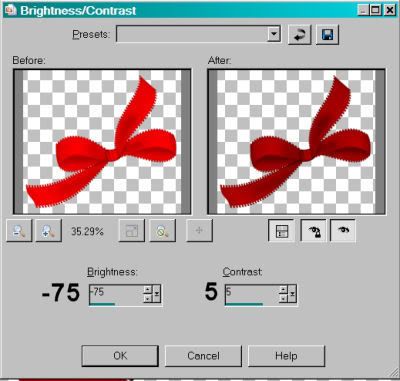
Copy and paste bow over your Love Lock. Drop shadow bow.
Open Doodle3. Copy and paste as a new layer, above the background layer. Duplicate this layer. Image > Mirror. Image > Flip. Position as desired. Merge down these two layers and give your doodles a soft drop shadow.
Add your name. If using a blocky font as I did, the Extrude filter will work well. For the name I used Foreground color #9a0505. Background #f08fb4. Stroke 2.
Now Effects > Plugins > Alien Skin Eye Candy 5 > Impact > Extrude with the following settings:
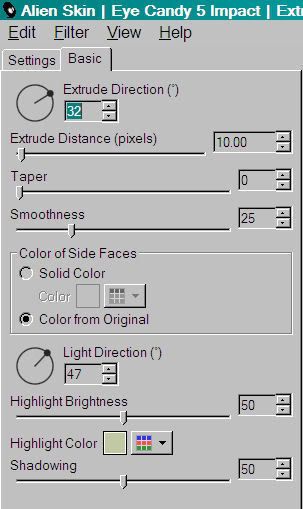
Drop shadow your name.
Add your copyright, license number if applicable, and tagger's/water mark.
Resize your tag.
Now, go back to the original GlitterHeart layer and duplicate twice, for a total of three layers. X out the top two layers and highlight the bottom layer.
Effects > Plugins > VM Natural > Sparkle with the following settings:
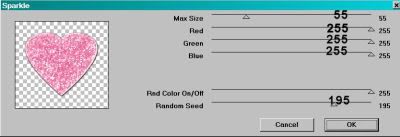
I know that's a bit small, so the numbers are, in order, 55 - 255 - 255 - 255 - 255 - 195
X out of the bottom layer, and highlight the middle GlitterHeart layer. Add the filter again, but this time move the "Random Seed" slider to a different number. Hit okay.
X out of the middle layer of the GlitterHeart, and open the top. Again with Sparkle, and again move the "Random Seed" slider to a different number.
AND... lol.. again I'll say that whenever I use this filter, I go through that process again on all three layers, in order to get more sparkles on them. You can do so or not, whatever suits you.
X out of the top layer and open the bottom layer.
Edit > Copy merged
Open Animation Shop and paste as a new animation.
Go back to PSP, X out of the bottom layer and open the middle one. Edit > Copy merged
Again, go to Animation Shop and this time, Edit > Paste > After current frame.
Return to PSP and X out of the middle layer, open the top. Edit > Copy merged
Back to Animation Shop and Edit > Paste > After current frame
Staying in Animation Shop now, Edit > Select all. Right click the top bar of the animation and choose Frame Properties. Change this to 25.
View > Animation. If you like what you see, save as .gif and we're done! Thank you for trying my tuts! Have a great day!
.


Outstanding tutorial Kajira! And I love the finished product. Great work!
ReplyDeleteGene
gene_gonzales@mac.com
Site: www.genegonzales.com
Blog: http://genegonzales.blogspot.com/
Prints: http://genegonzales.imagekind.com
Wow! Thanks, Gene! What a surprise! THANK YOU so much for coming, looking and ESPECIALLY for taking the time to comment. And so positively, at that! :) You've made the coming weekend look VERY good!
ReplyDelete